6 Man Play-Action Pass Protection
In past blogs on play-action pass protections we have discussed a 7 man, zone scheme protection and a 6 man, man scheme protection. This blog will cover a 6 man Man/Zone scheme pass protection and cover some reads for the QB.
Decisions
The First couple of things to always consider when sitting down to talk about protections as a staff is:
Play-action and/or 3 Step (what actions….. IV, toss)
Protections - 6 man or 7 man
Routes - how can we manipulate the defense and take advantage of how they are defending the option game
Personnel
Protections - How will we teach the OL their assignments? (Man, Zone/Slide, or Mix)
Will we use an A back in protection or will we use them as “rush” outlet throws?
What routes will we utilize?
Practice and organization?
Rules
PST : Blocks #1 in the option count. He will use his base blocking fundamentals for the first three steps to give the illusion of inside veer and then sink the hips and re-punch the breast plate keeping his outside eye and hip on the inside of the defender. The reason he must re-punch upon dropping his hips is because the defender is taught to convert from run to pass by breaking the hands of the offensive player off his body/chest. We want to re-establish our hand placement before that can occur.
PSG: If covered he will block the action key or man on. He will use his base blocking fundamentals for the first three steps to give the illusion of inside veer and then sink the hips and re-punch the breast plate keeping his outside eye and hip on the inside of the defender. The reason he must re-punch upon dropping his hips is because the defender is taught to convert from run to pass by breaking the hands of the offensive player off his body/chest. We want to re-establish our hand placement before that can occur. If uncovered the PSG will start the slide/zone part of the protection. He will slide down into the adjacent A gap to his inside and away from the call side protection.
Center - Responsible for the gap immediately away from the play-side/call side. If covered with no immediate threat in the gap away from the call then punch the down lineman with your outside hand and then slide. If there is no immediate threat in the adjacent gap then the player must get his eyes on second level defenders for blitz. The Diagram drawn doesn’t show a covered punch/slide concept because it is impossible to draw that way.
BSG - Responsible for the gap immediately away from the play-side/call side. If covered with no immediate threat in the gap away from the call then punch the down lineman with your outside hand and then slide. If there is no immediate threat in the adjacent gap then the player must get his eyes on second level defenders for blitz. The Diagram drawn doesn’t show a covered punch/slide concept because it is impossible to draw that way.
BST - Responsible for the gap immediately away from the play-side/call side. If covered with no immediate threat in the gap away from the call then punch the down lineman with your outside hand and then slide. If there is no immediate threat in the adjacent gap then the player must get his eyes on second level defenders for blitz. The Diagram drawn doesn’t show a covered punch/slide concept because it is impossible to draw that way. *If an edge rusher is in an immediate threatening position then the BST will make a fan call to alert the BSG to a possible stunt by the adjacent down lineman. In this instance there will be no punch and slide. *Think 312.
B Back - First he must sell inside veer, then settle in to the open gap based on the front structure, to the play-side A gap or B gap and spy the pslb. If the pslb drops then he must then help outside to any threat. We tell the B back he has a conditional gap to protect based on the front, he needs to see and know where to fit into the protection pre-snap.
QB - Open up like IV, our steps and body demeanor look like inside veer but we crouch and pull the ball into our belly button, we don’t extend the ball into a true mesh with the B back, but try and make it look like a mesh based on proximity and pad level to hide the football. Then he pushes for depth and sets up based on the pass routes called. When running the fake to the left a right handed QB will complete his fake just like he did to the right, but make a left handed drop and then flip his hips to convert to a right handed set at the top of his drop to make the throw.
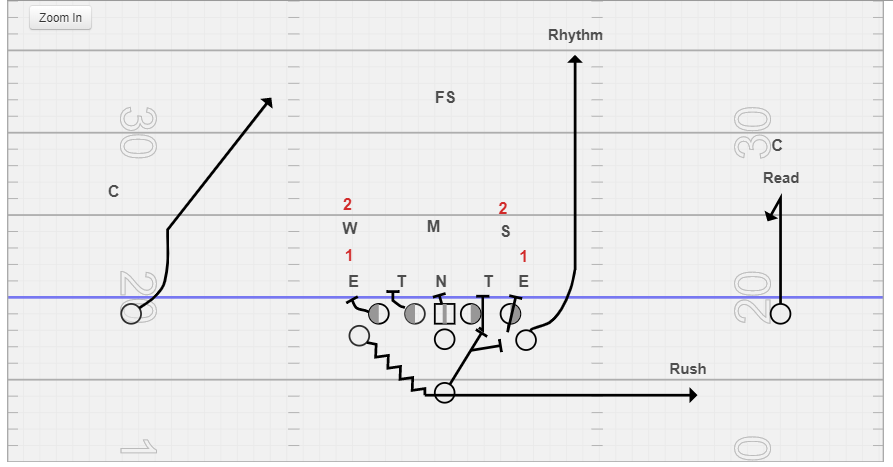
Using the images below we will discuss play action pass protection off inside veer using a man/zone scheme vs. various defenses. We used this scheme to force the play-side defenders to honor their option assignments, hopefully opening up windows and grass to attack with front side routes or with a backside route.
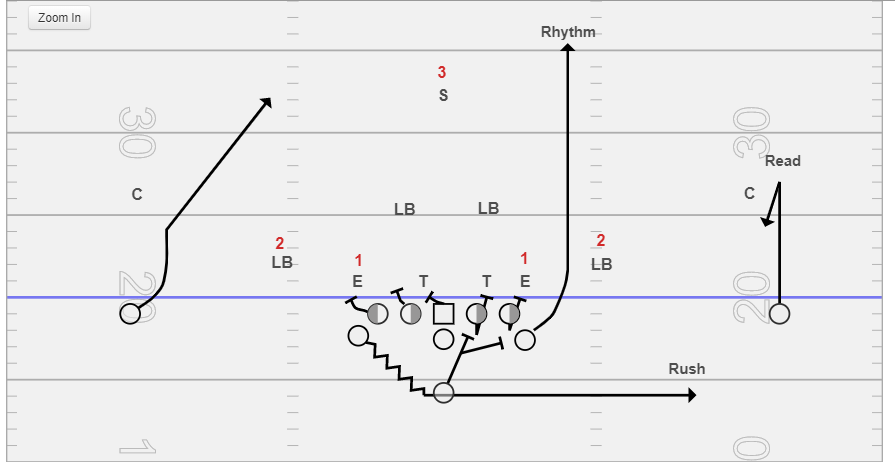
4-4/4-2-5
Center starts uncovered rule to slide/zone away from the call side protection
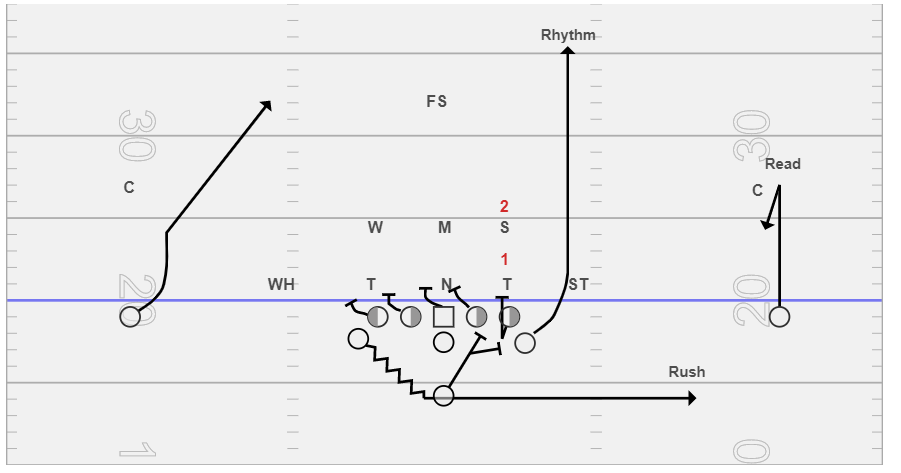
3-3 Stack
PSG starts uncovered rule to slide/zone away from the call side protection
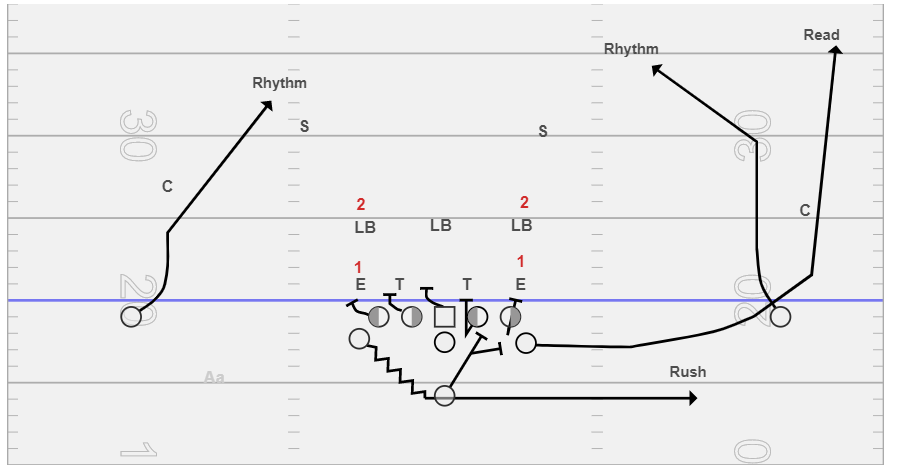
4-3/6-1
Center starts uncovered rule to slide/zone away from the call side protection

5-2/3-4
PSG starts uncovered rule to slide/zone away from the call side protection
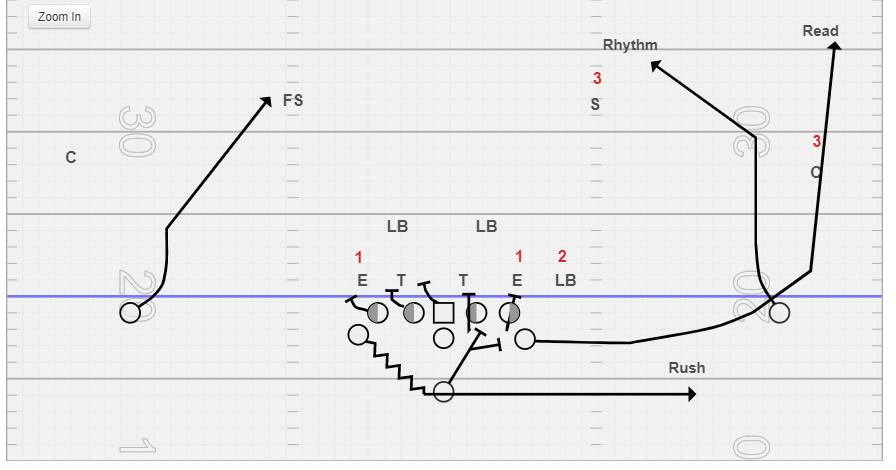
Under
Center starts uncovered rule to slide/zone away from the call side protection
Bear
Rule Adjustment has to occur with a Bear front. Since all OL are covered they Must block big on big vs. this front.
Tips and Reads
I want to highlight a few tips for play-action pass protections.
The first one is utilizing cadence to your advantage. We have mostly used an “On Two” snap count for all play-action pass protections. Our cadence is Down…Ready…Set. Our “On Two” cadence is Down…Ready…Set…Ready…Set. Our A back still goes in motion on the “R” in the first ready like he normally would but because we really want to effect the play-side defenders we snap the ball “on two” to get him out into the flat quicker. This tactic also allows the QB to read his pre/post snap indicators quicker because the motion is influencing those defenders responsible for QB and Pitch in the option game.
The second tip is to try to start the A backs motion on the “D” in down. This gives the illusion of toss motion in the backfield and can again manipulate play-side defenders.
The last tip is to teach the QB to understand who has pitch and how motion in play-action passes effect that defender. This defender is typically the person we read for a rhythm throw and the QB needs to know who/why we need to take advantage of him.
QB Reads:
We have incorporated a quasi R4 passing concept into all our play-action passing routes. That is to say we teach a Rhythm throw, a Read Throw of a hitch, and a Rush throw because of pressure. Our drops in play-action don’t necessarily match up with R4 teaching but our pre/post snap indicators are essentially the same.
Our next blog post will cover Junk Defenses with an emphasis on even fronts and as always feel free to discuss blog posts or ask questions on our forum page located here: http://flexbonenation.proboards.com/ If you have any questions please feel free to contact me on twitter @flexbonenation or my email address flexbonenation@gmail.com.