Post #2 in a Series of Blog Posts on No Huddle Concepts in an Option Offense
In this blog post we will discuss the first of many ways teams mechanically get their option plays into their players within a No Huddle concept.
I’m going to start by discussing the research behind what we decided to do and then discuss in subsequent blog posts what other No huddle option teams do. Hopefully, one of these ways can help you figure out the best avenue for you and your players.
The Research: Like everything we do, we always do research about a successful team we can visit, to see how they are doing the things we want to implement. We decided to visit a local team here in VA that was a very successful No Huddle spread team. We were able to see how they signaled their formation/plays into their players and the thought process behind it. We then went to Navy, who at the time was transitioning to a No Huddle approach. We studied how they were going to do it. Finally, I reached out to two other option programs that were exclusively No Huddle, to hopefully glean some different ways to do it other than signalling. We sat down as staff and went though all the research and settled on using wristbands for all our play calling.
The Wristband: Below is a copy of a wrist script we have used in the past. I want to start off by saying that using wristbands is a very time consuming process over the course of a season. We decided to use color coded columns with plays numbered 1-10. We felt we couldn’t go over 10 numbered plays per column because we didn’t want to overwhelm the players and the coach that was signaling . We came up with our color signals as a staff and we signaled the numbers with our hands. We also decided through the course of research that we would have all 22 offensive players (or more if they were ever going to play in a game) wear wristbands and that all players we responsible for getting the signals at the line of scrimmage. The little skill players were able to see the signals easily because they aren’t typically in a 3 point stance, but the big skill players had a harder time seeing. Remember in the beginning we were trying to still control tempo, so we called everything from the line of scrimmage. We decided that we would scan/check with me and have the lineman take a knee with their hand still on the ground and look over to the sideline, get the signals and then the QB would echo it for those lineman that struggled to see. The lineman would reset in their three point stance, adjust any pre-snap technique calls and run the play. We used only one signaler and we would change the plays in the columns every so often so we didn’t have any tendencies a team could pick up on. As we progressed we used two pained wrist bands with two wrist scripts. If you have coached in this offense long enough, you know that you need “Tags” to be able to adjust blocking assignments. Thus, we needed to add another wrist script so we had all the tags we needed, you never know how you will be defended until the first snap of a game!
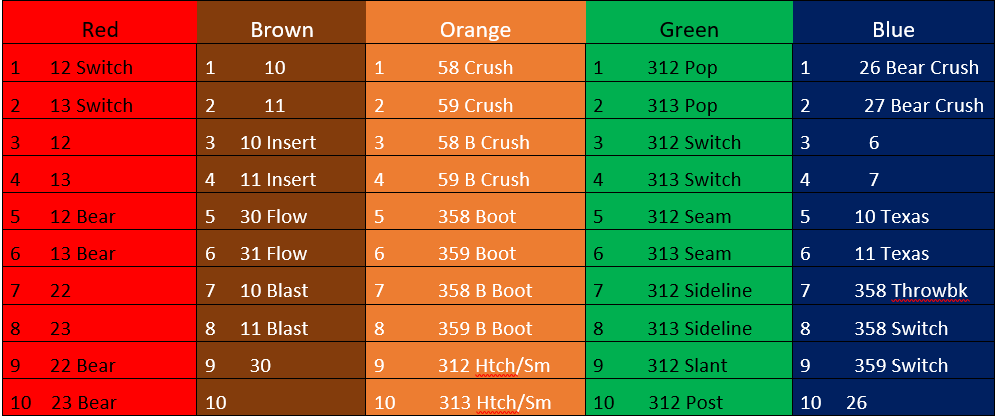
Sample Wrist Script
The Formations: We decided to color code all our formations, obviously we couldn’t use the colors on the wrist script columns but we wanted colors to be prominent within the program. So “Gold” was our base Spread formation, “Black” was our tackle over, unbalanced formation and so forth. We came up with a signal for each color, and we signaled that the very first thing after the previous play as the players were getting to the line of scrimmage. Once the players were in the desired formation we then signaled the play. Red #1 for instance would have been signaled by the coach touching the back of his neck and then holding up the #1 with his hand. Brown #5 would have been signaled by the coach rubbing his nose then holding up the #5 with his hand. The cool part we found is our kids really wanted to take some ownership day one, and decided to come up with all the signals we used. Assuming they were school appropriate, we went with it. We felt having the wristbands limited the number of signals we needed to get a play in thus allowing the coaches and players to do things faster.
The Game Plan: Below is a sample game plan link we used which tied the plays, play numbers and game situations together for the coaches. Make sure to change the view to 75%, otherwise you can’t see the whole game plan sheet.
There are two parts of the game plan spreadsheet, there are the game scenarios like 1st & 10, 2nd & 4-6, Openers, so forth. We tied the second sheet in the game plan to the personnel in the game, the D&D, the script number and play direction. So it auto populates the game plan with the calls we want vs. an opponent in certain D&D. So when you click on the game plan link above and look at base runs for example. Reading left to right, the first column is personnel in the game, the second column is the play call, the third column is the wrist script number. We would laminate a coaches copy of the wrist script to the back of the game plan sheet and use it in practice and games.
Our next blog post will continue with an emphasis on No Huddle concepts, as it pertains to how to get the play into the players and some tempo variations within a No Huddle Option offense. We will have a guest blog from Coach Aaron Makelky, he will detail how they do things in his program. As always feel free to discuss blog posts or ask questions on our forum page located here: http://flexbonenation.proboards.com/ If you have any questions please feel free to contact me on twitter @runthetriple or @themeshpoint and my email address is lafayettefootball1@gmail.com.
All the Best,
Matt McLeod